Zoom meeting, host instructions
The use of video conferencing and teaching via Zoom has accelerated in recent weeks. Many people are concerned about GDPR and privacy issues when using the video service. To address this matter, NORDUnet has listed privacy related facts pertaining the Zoom service, including an outline of what NORDUnet has done to be in compliance with GDPR and European privacy directives.
1. Before the meeting
See the basic information about Zoom and how to start with it.
See Zoom meetings privacy and security information.
1a. Create Zoom meeting
You can create a new Zoom meeting in advance either from Zoom web pages or directly in Zoom application.
Zoom web portal
- go to URL tuni.zoom.us
- select Sign in
- sign in with your TUNI account
- click Schedule a meeting in top right corner to create a new Zoom meeting
Zoom application
- start Zoom application and sign in with SSO option (if needed, type in URL tuni.zoom.us)
- click Schedule button in Home tab
In both ways you can set the following meeting information and options:
- Topic and description
- When the meeting starts and how long it lasts
- If you want to re-use the same meeting with the same meeting link (teaching, weekly meetings), check ”Recurring Meeting” and select recurrence options.
- If you want to keep the meeting always available, check ”Recurring Meeting” and select ”No Fixed Time” in Recurrence form field. By doing this the meeting will be usable for 365 days.
- Meeting Passcode: required, prevents joining the meeting by guessing the meeting ID
- Waiting Room: when enabled, the host must accept each participant to join the meeting
- Video: select whether the camera is automatically on or off when hosts and participants join the meeting. Off is recommended in most cases.
- Audio: select what audio connections are available for participants. Computer Audio is recommended. Enable telephone only when you know that some participant will need to use telephone.
Note! Some browsers do not allow you to use the “Join Audio by Computer” option, in which case Zoom will suggest that you join the meeting by calling Zoom phone number, regardless of the above audio setting. In this case, it should be noted that calling the Zoom meeting by phone is always subject to a fee. Since October 2020, only Swedish and German local numbers are available and work with TUNI Zoom meetings.
- Calendar: (Only in app) select which calendar software Zoom starts and fills calendar invitation with meeting information.
(Not needed, please copy meeting information directly to normal calendar invitation.) - Meeting Options:
- Allow participants to join anytime: Participants can join the meeting at any time without the host being present.
- Mute participants upon entry
- Require authentication to join: Only signed in users can join the meeting (all participants must have TUNI account)
- Alternative Hosts: you can designate another TUNI user to start the meeting or webinar if you are unable to. See Zoom Help Center: Alternative Host
More information in Zoom Help Center: Scheduling
External guest lecturer?
If the host of a video meeting, such as a guest lecturer, is from outside the university community from another organization or company, the Zoom video meeting requires special measures. It is not possible for an external person to create a separate Zoom ID to create a Zoom video meetings, nor can he or she be pre-added with an Alternative Host email address to an meeting because Zoom only allows members of the same organization to be Alternative host. If there are several lectures given by the same external guest lecturer we recommend making a resource agreement for TUNI account. For single lectures without resource agreements for external lecturers these restrictions can be circumvented in a couple of different ways:
1. The person responsible for the course or the event creates a video meeting with his TUNI ID and joins the video meeting at the beginning of the event and hands over his Host role to the remote lecturer who has joined the meeting as a guest. The remote lecturer can manage the meeting and make a local or a cloud recording to Panopto if the original creator of the video meeting link has cloud recording enabled (only for staff). The cloud recording goes to the Panopto folder of the author of the original link. Read more about recording a Zoom video meeting.
2. Another participant in the video meeting creates a Zoom video meeting with their own TUNI ID and hands over their Host role to the external host of the video meeting at the beginning of the meeting. In a teaching situation, this means that one of the students participating in the video meeting is designated as the Zoom contact and he / she creates a recurring video meeting for lectures with his / her own ID. This is possible because students and staff have exactly the same Zoom licenses. The Zoom contact delivers the address of the Zoom appointment to others, joins every zoom session via TUNI login, and hands over his Host role to the external lecturer who joins the appointment without logging in, that is, with his or her name alone. In this way, the external guest lecturer gets full rights to manage the participants in the video meeting and make a local recording on their own computer.
3. Someone other than the video meeting participant, for example the responsible teacher of the course, creates a Zoom video meeting with their own ID with specific settings so that they can join the video meeting without the presence of the host person. Limitations of this method:
• The Zoom video meeting creator cannot have more than two Zoom meetings up and running at the same time
• No participant in the meeting has a Host role -> no recording option, no possibility to mute the participants' microphones
Language interpretation and sign language interpretation
If you want to use real-time speech interpretation for another language or sign language interpretation at the event, the host of the link must first enable the interpretation function from their own settings.
- Log in to https://tuni.zoom.us/ and select settings and enable the function Language interpretation or Sign language interpretation view for sign language interpretation
- In the meeting link settings, you can now enable speech interpretation with the Enable language interpretation function or for sign language with the Select sign language interpretation video channels below function. You can add interpreters (e-mail address) and Language choices from which language to interpret and to which language. Interpreters will receive a personal invitation to their e-mail.
- During the meeting, the event organizer can see the Interpretation function in the bottom bar of the Zoom application, which enables the interpretation (start). The menu also shows whether the previously defined interpreter has already joined the event. The role of interpreter can also be assigned to the participant at this stage (add interpreter)
- From the interpretation function, the audience can see the choice of which spoken language they want to listen to or, in the case of sign language, watch
- Speech interpreters can see the choice of which language to listen to (Listening in) and the choice of which language they want to interpret into (Speaking to)
Zoom's own instructions on language interpretation and sign language interpretation.
1b. Send or share Zoom meeting link and Meeting ID to participants
From meeting summary page, copy meeting information to an email message, calendar invitation, Moodle, etc.
See Zoom Help Center: Where can I find the meeting invitation text?
If you are arranging public Zoom meeting and sharing the meeting link on public website, Facebook or Twitter, please read the Zoom instructions to minimize the risk of trolling from misbehaving participants.
1c. Prepare Polls (if needed)
The polling feature for meetings allows you to create single choice or multiple choice polling questions for your meetings. Polls need to be created in web portal before the meeting.
See Zoom Help Center: Polling for Meetings
1d. Test your audio
See Zoom Help: Testing computer or device audio
1e. Waiting room settings
It is possible to edit the text and appearance of the waiting room, and the organizers of the event can send chat messages to the participants in the waiting room during the Zoom meeting. Please note that the participants in the waiting room cannot see previously sent messages, and they can only send messages to the organizers if a message has been sent to them first. During the meeting, you can use the chat tool to choose whether the message is sent to everyone in the waiting room or to an individual participant.
You can edit the settings of the waiting room by logging in at tuni.zoom.us . Waiting room options are in the Settings tab, where you can choose:
- Customize waiting room. You can edit the text displayed in the waiting room. In addition to the text, you can add a picture or a logo to the waiting room
- Edit options.
- You can choose whether to display those in the waiting room in order of arrival or in alphabetical order, the setting is "Sort order of people in the waiting room in the participants panel".
- You can allow replying to chat messages in the waiting room with the setting "Allow participants in the waiting room to reply to host and co-hosts".
2. During the Zoom meeting
Start the meeting by clicking the blue Start this Meeting -button in the meeting information view.
Check your audio (see the previous link).
In Zoom meeting window, you find the meeting controls from bottom of the window:
- Security/Host Tools
- enable or disable waiting room
- Allow (or prevent) participants to use camera, microphone or share screen
- Participants: participant list and management
- Polls:
- Share: sharing your screen or specific application. See below.
- Chat:
- Record: record your meeting. See below.
- Breakout Rooms: you can split your Zoom meeting in up to 50 separate sessions. See Zoom Help Center: Managing Video Breakout Rooms
- Whiteboard (New whiteboard tool Q2/2022)
- End: Leave the meeting or end it from all the participants.
2b. Sharing your screen
Zoom allows for screen sharing on desktop, tablet and mobile devices running Zoom. Also participants can share their screen in normal Zoom meetings.
1. Start sharing with Share button located in your meeting controls.
2. Select what to share:
- Screen: everything you see is also shared to other participants. Use this if you switch between applications. To avoid showing private information, turn of notifications or close email and messaging applications. Tip: if you're using two screens, you can select both screens or select apps by selecting them with the Ctrl key on Windows devices (or shift key on MacOS devices).
- Application: Show only one specific application. Application needs to be open and running before it's listed in Zoom.
- since version 5.4.6 (15.12.2020) you can select multiple applications to be shared at the same time)
- Whiteboard
- Second webcam or other video source (from Advanced tab)
3. If you show/play video or audio files and want to share any sound played by your computer, select Share sound.
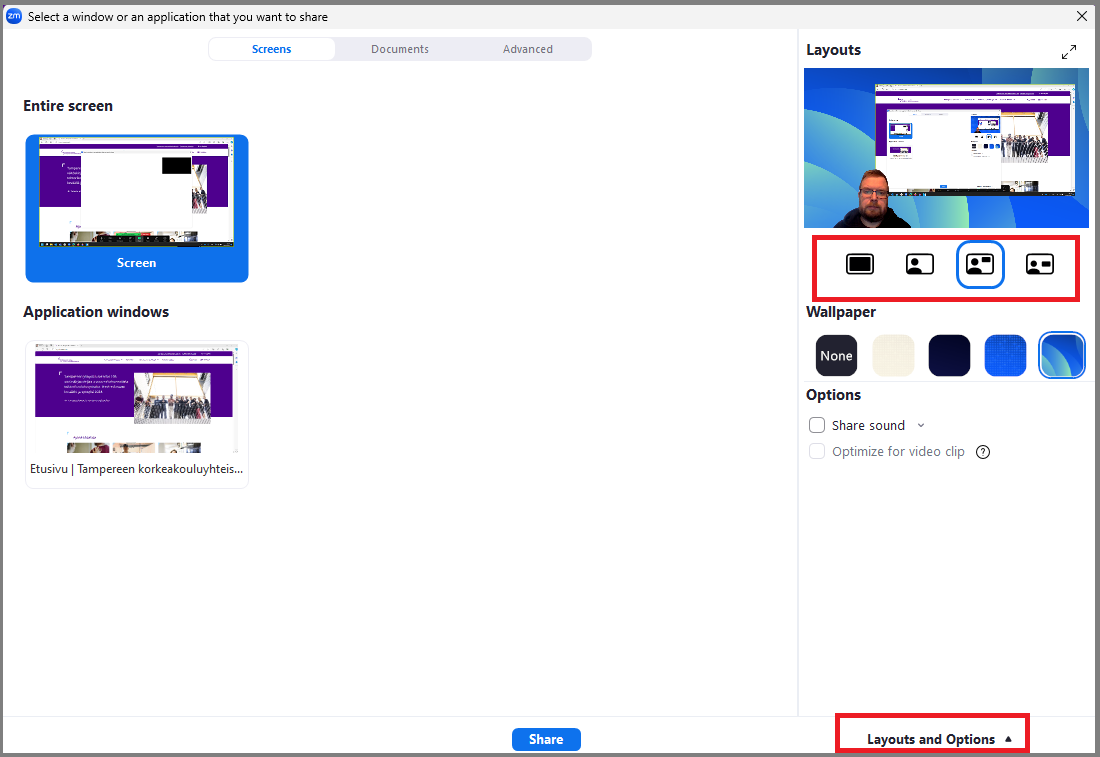
4. Select layout
5. Click Share
With the layouts function you can choose a camera image to be displayed on top of or next to the presentation material. However, this does not affect the recording, only how the layout looks during the event.
When you start sharing your screen, the meeting controls will move into a menu that you can drag around your screen.
Sharing controls:
- New Share: Switch to a new screen share.
- Pause Share: Pause your current shared screen.
- Annotate: Display annotation tools for drawing, adding text, etc.
- Remote Control: Allow another participant to control your computer remotely
- More -> Share computer sound: Share any sound played by your computer to other participants during screen sharing.
5. Click Stop Share button to stop sharing.
More information: Zoom Help Center: Sharing your screen
2c. Recording your meeting
As meeting host you can record your Zoom meeting to a local MP4 video file and/or directly to the Panopto. Start recording from Record button in meeting controls.
2d. Managing participants
As the host in a meeting, you can manage the participants. In Participants view you can
- mute microphones of all other participants (Mute all)
- unmute microphones from all (Unmute all)
- prevent/lock participants to unmute themselves (More > Allow participants to unmute themselves)
- lock the meeting so that no new participant can join it (More > Lock meeting)
- mute or unmute single participant
- assign recording privileges to some participant
- assign host or co-host role to other participant
See Zoom Help Center: Managing participants in a meeting
2e. Breakout rooms
Breakout rooms allow you to split your Zoom meeting in up to 50 separate sessions. The meeting host can choose to split the participants of the meeting into these separate sessions automatically or manually, and can switch between sessions at any time.
See Zoom Help Center: Managing Video Breakout Rooms
2f. Ending a video meeting
When you leave a video meeting with End Meeting or by closing the check box in the upper right corner of the Zoom window, Zoom asks if you want to end the video meeting with all participants or just leave it yourself:
- End meeting for All: All participants will be notified of the end of the meeting and the meeting will close
- Leave meeting: other participants can continue the video meeting and one of them will get the host role when you leave the meeting.
3. After the meeting
3a. Process and share the meeting recording
Local recording: Zoom converts video meeting recording to mp4 video format after you leave video meeting. At the end of the zoom meeting, a window will appear on the screen showing the progress of the video meeting recording conversion process. The conversion to MP4 hast to be done so that the video can be viewed and shared with normal video applications. You should allow the conversion to complete after conversion is started so basically do not log off or shut down your computer until this window has disappeared.
Once the conversion process is complete, the meeting folder under Documents\Zoom containing the recording files will open. For sharing the recording with other people, you need to upload the MP4 file to Panopto video service.
Cloud recording: You find the recording session from Panopto: Meeting Recording subfolder in your My Folder. From there, you can move the session to a correct Panopto folder or you can share the session from Meeting Recording folder by editing the session's Share settings.
More information
IT Helpdesk
0294 520 500
it-helpdesk [at] tuni.fi (it-helpdesk[at]tuni[dot]fi)
helpdesk.tuni.fi