Zoom meeting, recording
Zoom can be used to make either local video recording or cloud recording directly to the Panopto video platform. Video recording allows users to save meeting video and audio as a single video file. The video recording is started from the Record button at the bottom of the meeting window. When launched, the application adds recording controls to the meeting window, from which the video recording can be paused or stopped. N.B! The meeting organizer (host or co-host) must record the meeting or grant another participant the right to record.
Using the breakout rooms function, i.e. dividing the main meeting into small groups, affects the recording in such a way that what the participant who started the local recording sees in his application is recorded (also in the Breakout rooms he visits) If recordings are to be made in each Breakout room, there must be a participant in each Breakout Room with recording rights so they can start local recordings. In cloud recording the Breakout rooms are not recorded, the recording remains running in the main room while using Breakout rooms. If the Host leaves the main room, the cloud recording is interrupted for the duration of the absence.
Local recording on your own computer
Start the recording from the Record button in the Zoom application on your computer. If Zoom opens a menu, select Record on this Computer. When the video meeting is over, Zoom will convert the recording of the meeting into a video file that you can publish, for example on the Panopto video service.
You can find the video recording in the Documents\Zoom folder on your computer. Zoom will create a subfolder there for the meeting and you can identify the correct folder by the date and the name of the meeting. The file folder usually contains three files, of which you only need the largest MP4 video file (video123456789.mp4). The other two files are the audio track (M4A) and a small playlist file. If you have stopped and restarted recording during a Zoom meeting, more MP4 video files will be created.
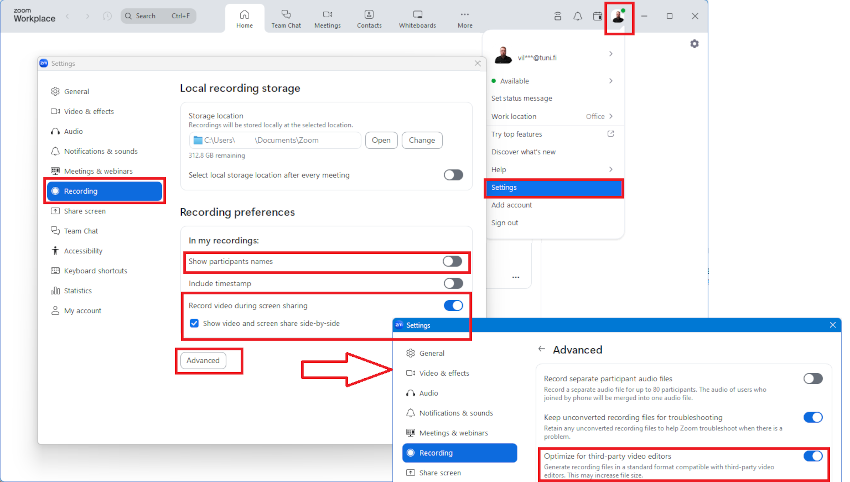
Recording settings are defined in the Zoom app settings: top right corner of your profile picture > Settings > Recording. Recommended settings:
- Optimize for 3rd party video editor (to reduce the risk of image errors)
- Show video during screen sharing (the camera image does not cover the screen sharing).
- Uncheck "Show participants names" (if you don't want the participants' names to appear on the recording)
Note! Do not change your recording folder to a network drive (S and P drives) as this will increase the risk of recording failure.
Tips on settings that affect the recording layout:
- The meeting view of the user who is recording with the Zoom application is what is recorded, if the view or other settings are changed during the event, it will also change for the recording
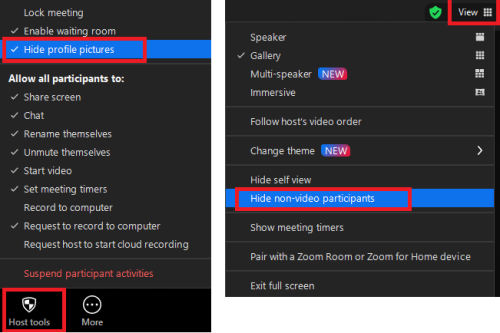
- In the settings of the Zoom application, profile picture>Settings>Video, you can select Hide Non-Video Participants (to hide participants without a camera). The same setting can also be found during the meeting in the view menu in the upper right corner of the meeting window.
- In addition to the Hide Non-video Participants setting, you can use the Gallery view layout (view menu), so that the participant does not even show on a non-video tile in the recording, even if he is speaking to the microphone. Only participants with the camera on are visible.
- The Security menu shows the option to Hide profile pictures, you can hide the profile pictures that the participants have set for themselves
Cloud recording directly to Panopto
New functionality in February 2023. Principle of operation:
- You start cloud storage from the Zoom app or from the web browser view
- The recording is done on the NORDUnet server.
- After the video meeting, Panopto retrieves the video recording and exports it to your My Folder folder in the Meeting Recordings subfolder. The recording goes to the Panopto folder of the creator of the Zoom meeting link, even if the cloud recording is started by an Alternative host or Co-Host. Copying the recording link from Zoom’s web portal or from the Zoom app’s Hub does not work because the recording is redirected to Panopto.
- You publish the recording as you wish in Panopto: move the recording to another Panopto folder or edit the Share settings of the recording and send the link to your viewers
Requirements:
- You have a staff role
- You have a My Folder folder in Panopto, i.e. a creator role (see Panopto instructions).
If you make a cloud recording before you have a My Folder folder in Panopto, the recording will go to a folder in Panopto that only Panopto administrators have access to. In such a situation, please contact IT Heldesk.
When you are a staff member and have host, co-host or individually assigned recording rights in a Zoom meeting, you will see a Record function in the Zoom meeting view. In the Zoom application on your computer, the Record function opens a menu where you can choose whether to record on your own computer (Record on this Computer) or record to the Cloud (Record to the Cloud).
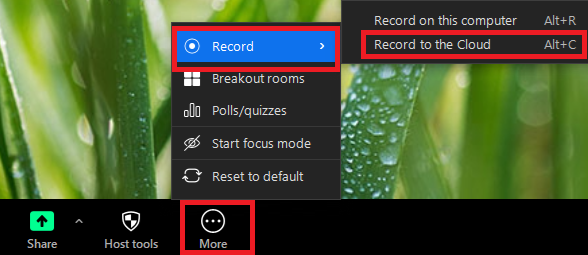
Zoom Record menu for staff.
If you want to make both recordings at the same time, use the keyboard shortcuts (Windows/Mac):
- Alt-R / Command(⌘)+Shift+R = record on your computer
- Alt-C /Command(⌘)+Shift+C = record to the cloud (Panopto)
The keyboard shortcuts to start the recording must also be used, for example when the local recording is started in addition to the cloud recording on another computer by another participant, those who have recording rights in the meeting can stop and start the cloud recording of the meeting. In the Linux application, the keyboard commands are not available, so you have to start the backup recording on another computer or mobile device.
When you stop the cloud recording, Zoom will tell you in the confirmation window that you should receive a message from Zoom when the cloud recording is complete. This is not true in our case. Also, you won't see any entries in Zoom's Recordins list for cloud recordings you've made.
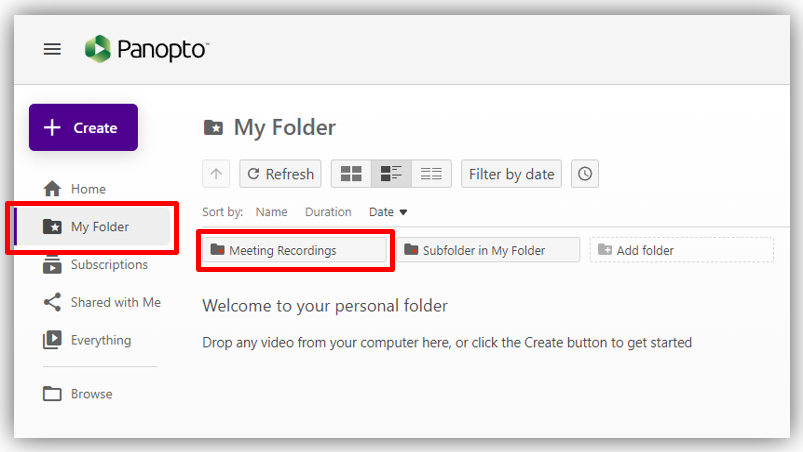
In Panopto, you can find the cloud recordings in Meeting Recordings subfolder of your My Folder:
The cloud recording will be available for viewing in Panopto 1-4 hours after the end of the Zoom session. If you want to receive an automatic email from Panopto when a recording is completed, you will need to edit your notification settings in Panopto:
your profile picture in the top right corner > User settings > Notifications > Video and folder notifications
Please note that once you have turned on this setting, you will also receive notification messages for your other Panopto recordings.
You can find the settings for cloud recording on the Zoom web portal https://tuni.zoom.us > Sign in > Settings > Recording
Under Cloud recording, select only these options:
- Record active speaker with shared screen (The camera image will be recorded on top of the screen sharing in the top right corner).
- Record thumbnails when sharing (if you want the camera image to the recording during screen share)
- Optimize the recording for 3rd party video editor
- Save chat messages from the meeting / webinar (if you want chat messages that are visible for everyone to be recorded as well).
Automatic routing to a specified Panopto folder
You can set up automatic routing rules for any recurring Zoom meeting using Zoom Meeting ID. This directs the recorded Zoom session to a specified folder. The folder may be shared with other users in advance, so recordings will be automatically available to those users, for example to the course students. You may also change the default folder for your Zoom recordings when advanced routing rules are not set. Note: This mapping will only work if the Panopto user with the mapping is also the primary host of the Zoom meeting ID used. Folder mapping will not work if a co-host of a Zoom meeting requests it. When folder mapping is active for some Meeting ID, recordings will be directed to that folder regardless of who started the recording.
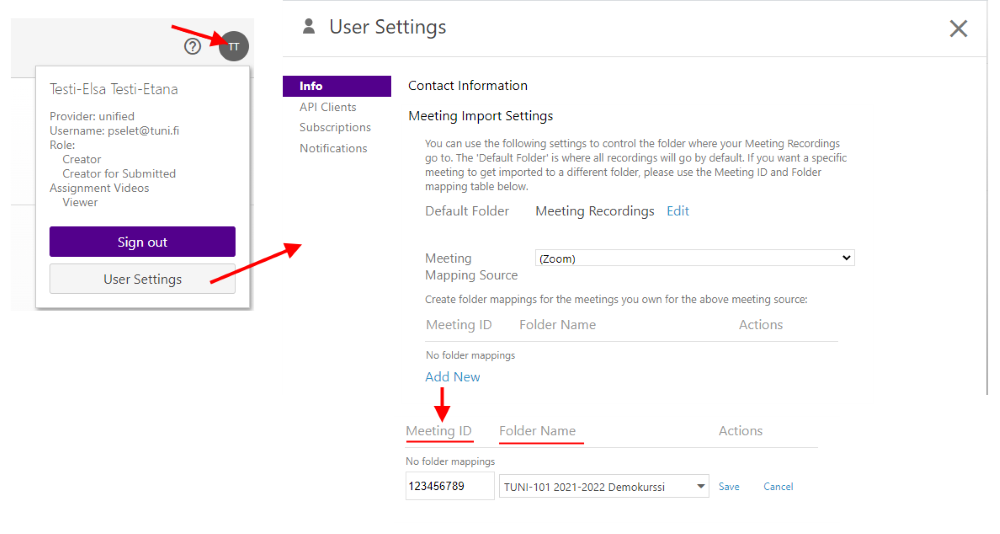
- Select your username from the top right corner of Panopto.
- From the dropdown menu that appears, select User Settings.
- On the User Settings pop-up window, scroll to Meeting Import Settings
- Select Add New to create a folder mapping for a recurring Zoom meeting
- Fill out the following information:
- Meeting ID: input your Zoom meeting ID into the textbox
- Folder Name: select the dropdown menu and select the folder to which you'd like this recurring Zoom meeting to be saved. Note: if the folder you are seeking doesn't appear, you can start typing its name to search.
- Select Save to save this mapping, or Cancel to exit without saving.
IT Helpdesk
0294 520 500
it-helpdesk [at] tuni.fi (it-helpdesk[at]tuni[dot]fi)
helpdesk.tuni.fi