Interview data
Collecting interview data by phone
Transcription of interview data
Data classification
Interview recordings always contain personal data because the interviewee can at least in theory be identified from the recorded voice, image, or the content of the answers. The sensitivity of personal data to be processed must be determined before the interviews begin. In the case of interview data, this is often ‘regular’ personal data, but personal data on, for example, minors or sensitive subjects require special attention.
Links:
Choosing the recording equipment
Different means can be used to collect interview data, such as phones, remote meeting services, voice recorders and cameras. Since personal data is processed, special attention must be paid to the security of recordings throughout the handling process.
Links:
- Data security of voice recorders and cameras
- Data security guidelines for setting up remote meetings and interviews using Teams or Zoom
Storing interview data
See the instructions for secure file storage on the page Secure file storage. Files belonging to the data class 1R must be stored encrypted using dedicated software, see instructions on the page File encryption.
Collecting interview data by phone
The easiest way to record an interview is usually by phone. The following instructions are the easiest way to save your interviews to a secure storage. Once transferred, the recordings can also be easily transcribed on your computer.
- Intune: If your phone is not already enrolled in Intune mobile device management, follow these instructions to deploy it: Implementation of Phone and Mobile Device Management.
- Record interview: Use the app you want, for example, Voice Recorder on a Samsung phone or Voice Memos on an iPhone. You can accept their terms of use. If you are using a different brand of phone, look for a device manufacturer's dictation app or install a simple dictation app in the personal profile app store, and check that it does not send any part of the dictation data to any cloud service. Change the settings of Voice Memos on your iPhone so that it doesn't use location, Siri, or search.
- Copy the recording to OneDrive or Teams workspace:
- On a Samsung or other Android phone: Launch the Voice Recorder (or other dictation software), open the recording, tap Share > Work > OneDrive. Browse to the OneDrive folder or the Teams workspace folder where you want to copy the recording. Your Teams workspaces can be found by selecting Libraries in the upper left-hand corner menu. Tap the tick symbol in the top right corner to copy the recording.
- On an iPhone:
- To OneDrive: In Voice Memos, select Share > OneDrive from the three-dot menu on your recording. Browse to the OneDrive folder where you want to copy the recording and tap Upload here.
- To Teams workspace: Select Share -> Teams (possibly More in between) on the three-dot menu for your recording in Voice Memos. In the search box, type a snippet of the name of the Teams workspace or the channel you want, select the Teams workspace channel you want, and tap the arrow icon at the top right.
- Check the recording and remove it from your phone: On your phone, start the OneDrive or Teams app depending on which one you copied your recording to. On a Samsung or other Android phone, the app must be launched in a work profile. Open your recording and play it to make sure it has been copied correctly. Rewind the recording close to the end and listen to a clip from there as well. If you can't test the recording on your phone, you can do it on your computer. Once you have confirmed that the recording has been copied correctly in OneDrive or Teams workspace, remove the recording from the phone by selecting it in the recording app and selecting the trash can icon.
NOTE: If your interview may contain special categories of personal data or other material that could result in greater than minor damage if revealed, it must be stored encrypted with a separate software. See instructions on the page File encryption.
Transcription of interview data
If you do not do the transcription yourself, you must ensure that the material is only disclosed to a party that has an appropriate contractual relationship with the University as regards the processing of personal data. This applies to both manual and automated transcription. Tampere Universities community has tendered the purchase of transcription services, see further information on the page Transcription services.
Transcription of interview data with speech recognition programs
There are a few ways to transcribe material with speech recognition programs. The output has to be corrected in most cases, but nevertheless, automatic transcription speeds up the process.
Method 1: Subtitle Edit
This solution is also suitable for situations where the interview material contains special personal data or personal data that is subject to specific requirements. See instructions on the page Subtitle Edit instructions.
Method 2: Clipchamp service
Note: This solution is not suitable for situations where the interview material contains special personal data or personal data that is subject to specific requirements (for more details, see Data Classification and Handling). Thus, the transcription of such material must be done manually or via other services.
You can use Microsoft Clipchamp to transcribe videos. Upload the transcribable file to OneDrive or open a web browser at https://portal.office.com, log in with your TUNI email address and select Apps --> Clipchamp from the bar on the left. The Transcript function is on the right. If your material is audio instead of video, launch the editor within Clipchamp to transcribe the material. Recommended browsers are Edge, Chrome and Safari.
Method 3: Word online
Note: This solution is not suitable for situations where the interview material contains special personal data or personal data that is subject to specific requirements (for more details, see Data Classification and Handling). Thus, the transcription of such material must be done by manually or via the above-mentioned services.
It is suitable for small-scale needs (limited to 5h/month).
Short tutorial by Microsoft.
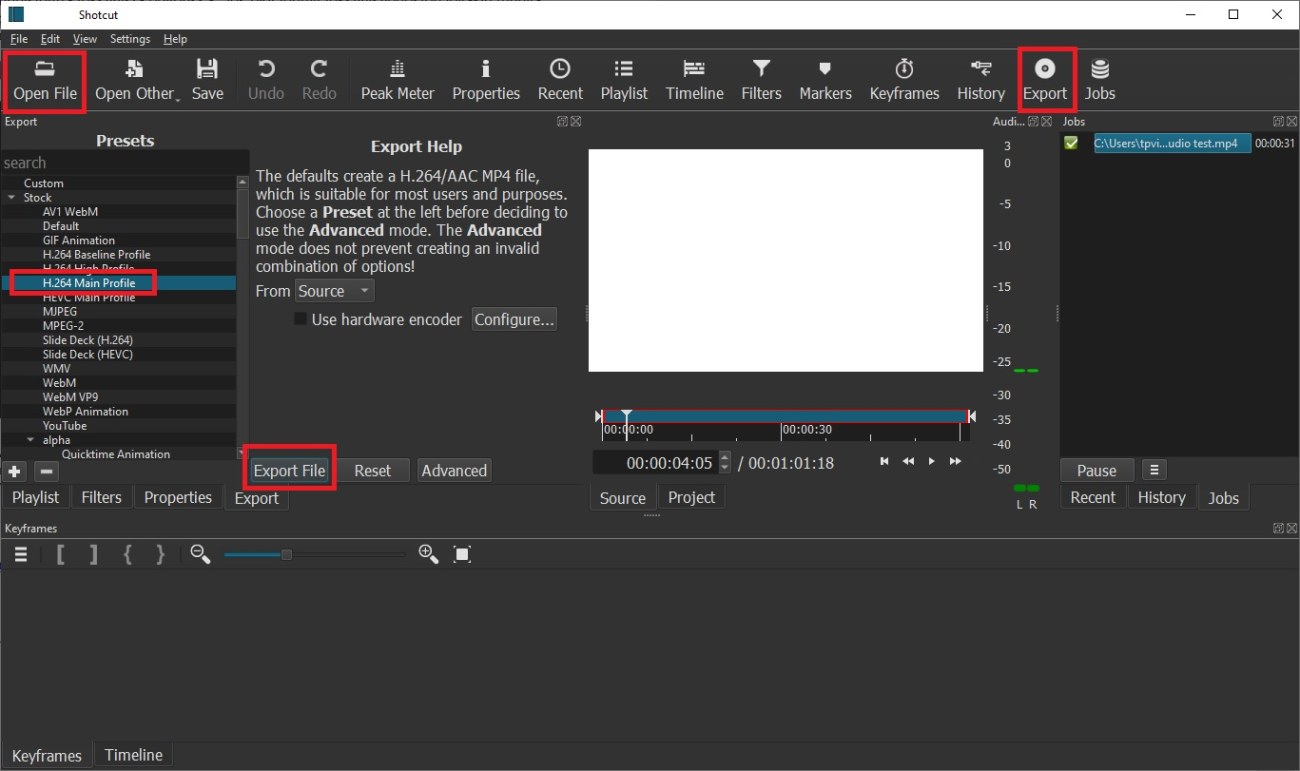
Convert audio file to MP4 video file with Shotcut editing software
Shotcut editing software can be installed on a Windows computer from the Software Center.
Shotcut allows you to convert an audio file into a video file so that the program adds a background colour to the video.
- Open the audio file to be converted in Shotcut, select Open File.
- Choose Export.
- Select H.264 Main Profile.
- Select Export File to start file conversion.