Teams meeting practices
Teams meeting recordings
If a meeting is created as a Teams meeting between two or more people, the recording will be saved on the OneDrive of the person who organizes the meeting and thus the organizer of the meeting becomes the owner of the recording. Previously, the recording was saved in the recorder's OneDrive. A link to the recording is automatically added to the meeting's conversation view, and meeting participants are automatically granted access to the recording. When needed, the owner of the recording can also change the access rights immediately after the recording is completed.
If the meeting is created on Teams workspace, the recording is saved in the workspace files and can be viewed in the Recordings directory via Teams or SharePoint, and from the link in the chat window. Access is automatically granted to anyone who has access to that workspace.
When the recording is saved in OneDrive or Teams workspace:
- Permissions are easier to manage.
- Controlling access to the recordings is easier.
- It is faster to view the recordings.
The default expiration time for meeting recordings is 180 days.
Sharing the Teams recording to Tampere Universities
- Find the recording in OneDrive or SharePoint.
- Move the mouse over the recording and click on the three dots next to the name, and a menu will open for you.
- Select Manage access from the menu.
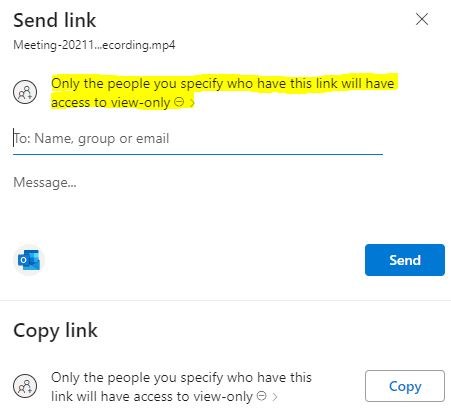
- Click Share.
- Click on the text below the name. It can be something else than in my example
- Choose People in TUNI.fi with the link from the options that open up
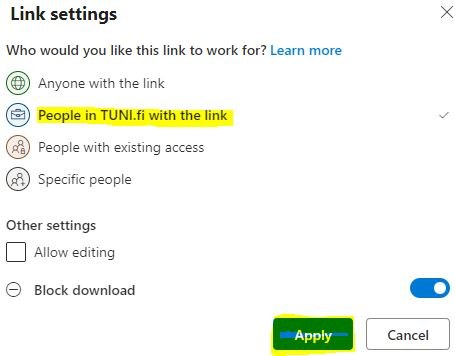
- Finally, confirm by clicking Apply.
- You can either send the link to the desired people by entering their email address in the To field and finally clicking Send.
Or you can click Copy and share the link you received in your desired message or, for example, on Intra.
What is a breakout room?
With breakout rooms, the organiser can divide the main meeting into smaller groups for discussion.
For it to work...
- All participants must have a sufficiently new version of Teams.
- As the organiser, you can see the breakout room icon. Participants cannot see it.

When and how can I set up breakout rooms?
- The organiser can set up breakout rooms as soon as the invitation has been extended.
- He or she can only create breakout rooms with the Teams desktop application, not with a mobile device or a browser.
- From the settings, the organiser can specify whether participants are automatically added to the rooms and whether participants have the option to return from the breakout room back to the main room.
- The organiser can transfer participants to the rooms only after they have joined the meeting.
How to set up a breakout room
The meeting organizer can create breakout rooms both by editing the meeting invitation via the Teams calendar and after joining the meeting with the Teams desktop application.
When creating breakout rooms, you are asked how many rooms are needed and whether the participants are added to the rooms automatically or manually. If you choose manually, you can define which room each participant is added to. After that, all you have to do is open the premises in the meeting, and the participants will receive a notification - the session will start in 10 seconds.
Participants who are not members of the universities community can be put in breakout rooms if they have joined the meeting with the Teams application.
If another organizer (co-organizer) has also been defined for the meeting, she/he can manage breakout rooms.
The organiser can visit the breakout rooms by selecting Join room from the menu.
Other alternatives in the organiser’s view:
- Open room
- Rename room
- Close room
- Remove room
The participant can return to the main room if desired by clicking on Return at the top. If a participant clicks Leave in the breakout room, he or she exits the entire meeting. By Joining the meeting again, he or she returns to the main room of the meeting.
If the organiser exits the breakout room, the situation will continue normally in the breakout room. If the organiser exits the meeting by ending it, the meeting ends for all participants.
Features organisers can use
- The organiser can only set up breakout rooms with the Teams desktop application after she or he has joined the meeting.
- A maximum of 50 rooms can be created in one meeting.
- The organiser controls the rooms. He or she can add, remove and rename the rooms.
- The organiser can decide whether the participants are added to the rooms automatically as the rooms open or whether they must first approve being transferred to the room.
- The organiser can send a notification which appears as a chat message in each room.
- Only the organiser has access to all the rooms and discussions, files, recordings etc. He or she can move freely between the rooms.
Features participants can use
- A participant can join a meeting with
- Teams desktop application or browser using a Windows or Mac computer
- The browser of a Linux computer
- Teams application on iPhone or Android mobile phone
- Teams application on iPad or Android tablet devices
- In the breakout room, participants have presentation rights so they can share their desktop.
- Participants cannot add others into the discussion or copy information from the meeting.
- Meeting participants can move between the main meeting and breakout room. By clicking Return in breakout room, they return to the main room and as long as the breakout room is open and they are accepted in that mode, they will also be able to return there.
- The discussions, files and recordings of the meeting can be seen by the participants and the organiser.
- Only the organiser has access to links. If the organiser shares the link, the participants have access to it.
- The breakout room function is not supported if a participant joins the same meeting and account from several devices.
Frequently asked questions
- Do others than the organiser have the right to create breakout rooms?
- No
- How can participants transfer from one breakout room to another?
- The organiser define the participants. After this, the participants will be able to join the breakout room and return from there to the main room as they wish as long as they are defined in the breakout room and the room is open.
- Can a time limit be set for a breakout room?
- Yes.
- Can the breakout rooms be joined several times during a meeting, or should the rooms always be set up again?
- The organiser can transfer participants from one room to another. The participants can also move between the breakout room and the main room.
IT Helpdesk
+358 294 520 500
it-helpdesk [at] tuni.fi (it-helpdesk[at]tuni[dot]fi)
helpdesk.tuni.fi