Teams meetings
Recording Teams Meetings
Recording Teams meetings is especially useful for information sessions, training events, and meetings that not everyone can attend. Recording is also recommended for meetings where many tasks or decisions are agreed upon. Recordings and transcripts improve discoverability and accessibility of information, as meeting content can be revisited later.
Start recording and transcription in a Teams meeting whenever the meeting content will be needed later and the information classification allows recording.
Before the meeting, ensure that the content can be recorded from an information classification perspective and that participants are informed about the recording and any transcription.
If the meeting involves Secret (1R) or Confidential Restricted (2A) information, the meeting must not be recorded and Facilitator must not be enabled.
Start a recording: Join the meeting > Select More actions (...) from the meeting toolbar > Select Record and transcribe after which you will be prompted to select what to record (video and audio or audio only). Recording automatically starts transcription and prompts you to choose the spoken language.
When recording starts, Teams displays a notification to all participants. Anyone joining the meeting can see that recording and/or transcription is in progress.
Stop a recording: Select More actions (...) > Select Record and transcribe > Select Stop recording.
The recording will also stop automatically when the meeting ends.
Note: The recording is not processed until everyone has left the meeting or the organizer has ended the meeting.
The meeting recording is automatically saved to the OneDrive of the person who started the recording (retained for 180 days) in the Recordings folder. For channel meetings, recordings are stored in the team's SharePoint files.
By default, external participants (outside TUNI) do not receive access to the recording or meeting chat. These must be shared separately. Sharing must be done from the file itself and requires the recipient to have Microsoft Authenticator enabled and registered with the organization.
Tip: For recurring meetings, you can enable automatic recording in the meeting settings under the Recording and transcription tab. Participants can then agree on recurring recording practices during the first meeting
Teams meeting recordings
If a meeting is created as a Teams meeting between two or more people, the recording will be saved on the OneDrive of the person who organizes the meeting and thus the organizer of the meeting becomes the owner of the recording. Previously, the recording was saved in the recorder's OneDrive. A link to the recording is automatically added to the meeting's conversation view, and meeting participants are automatically granted access to the recording. When needed, the owner of the recording can also change the access rights immediately after the recording is completed.
If the meeting is created on Teams workspace, the recording is saved in the workspace files and can be viewed in the Recordings directory via Teams or SharePoint, and from the link in the chat window. Access is automatically granted to anyone who has access to that workspace.
The default expiration time for meeting recordings is 180 days.
Sharing the Teams recording to Tampere Universities
- Find the recording in OneDrive or SharePoint.
- Move the mouse over the recording and click on the three dots next to the name, and a menu will open for you.
- Select Manage access from the menu.
- Click Share.
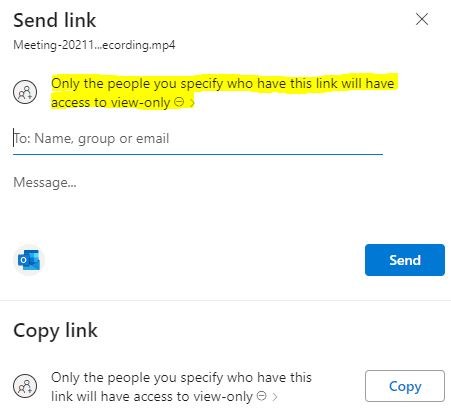
- Click on the text below the name. It can be something else than in my example
- Choose People in TUNI.fi with the link from the options that open up
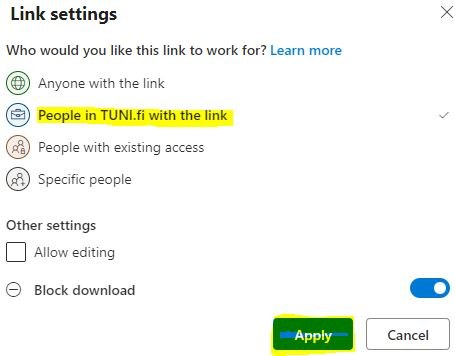
- Finally, confirm by clicking Apply.
- You can either send the link to the desired people by entering their email address in the To field and finally clicking Send.
Or you can click Copy and share the link you received in your desired message or, for example, on Intra.
Benefits of Microsoft 365 Copilot in Teams Meetings
(Paid license required - Recording or Facilitator must be enabled)
During the meeting, you can interact with Copilot about the meeting content and ask questions about events, decisions, and action items discussed in the meeting. For example, a participant who joins late can ask Copilot what has been discussed and agreed upon so far.
After the meeting, you receive a summary of the meeting and can continue asking AI questions related to the discussion. You can also use Copilot to create materials such as A PowerPoint presentation summarizing decisions or A project status report based on the meeting content
Microsoft documentation: Start, stop, and find meeting recordings in Microsoft Teams
Teams AI Assistant: Facilitator
Facilitator is a Teams AI agent that participates in a meeting as a shared assistant.
Unlike Copilot, Facilitator is not a personal assistant. All participants can see the notes, summaries, and chat messages it generates. However, only users with a paid Copilot license can interact with Facilitator during and after the meeting.
Facilitator can only be added to scheduled meetings. It cannot be used in channel meetings, instant meetings, or Teams calls.
To enable Facilitator: Open the meeting settings > Enable Turn on Facilitator.
Create a meeting agenda in the meeting invitation text field. Facilitator recognizes the agenda and uses it during the meeting. The agenda is displayed at the top of the meeting window.
During the meeting, Facilitator helps keep the meeting on schedule. It displays the current agenda topic, tracks time and notifies participants when the allocated time for a topic is about to expire. Participants can interact with Facilitator in the meeting chat by using an @mention or by selecting Ask Facilitator. For example: @Facilitator, summarize the discussion so far.
Microsoft documentation: Set up Facilitator in Microsoft Teams
IT Helpdesk
+358 294 520 500
it-helpdesk [at] tuni.fi (it-helpdesk[at]tuni[dot]fi)
helpdesk.tuni.fi